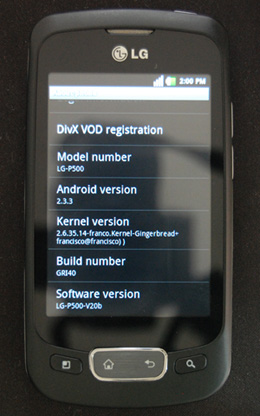
LG P500 (with a stock Android Froyo) since it came bundled with my mobile line (Globe). I have to say that this mobile OS is definitely for geeks. Since Android Gingerbread was already out, I decided to upgrade my phone’s OS. Here are the steps that I did to get my phone’s operating system (OS) upgraded, rooted and overclocked: 1. First, I installed the stock Gingerbread ROM from LG with these instructions. The ROM take note is from LG India, I chose this ROM because it is not locked to any mobile carrier. 2. After the upgrade, I rooted my phone with these instructions. Look up post #2. 3. Then I installed ROM Manager with these instructions. I installed this one because I wanted to make sure I have a backup of my ROM before I do anything else with it. 4. Then I installed Franco’s kernel for Gingerbread using ROM Manager. 5. Finally, I installed SetCPU and overclocked my phone to 729 MHz from 600 MHz. So far I’m very happy with the results. I chose the stock ROM because as much as possible I wanted most of the phone’s available hardware/feature running, just to let you know what’s working:
- WiFi – works as expected.
- GPS – works as well, not very accurate, was off by about 100 meters but I guess this is usual.
- FM – works as expected, the channel scanner was very helpful in setting up the stations.
- Bluetooth – works as expected, was able to pair it to my Plantronics headset and laptop with Win7 64bit. File transfers were a breeze though I had to set it up first.
- Camera – no kinks whatsoever, works as expected no bugs found so far.
- 3G/HSPDA – works as well but I disabled it on purpose since I have WiFi available most of the time.
- Tethering – this was the only thing that wasn’t working. I’m able to connect when the mobile hotspot was enabled, however, I can’t view any http data on my laptop. I can ping a domain though and it resolves to an IP but other than that nada.
 I chose the Franco kernel instead of stock because I wanted to try out the SmartassV2 governor for SetCPU. So far no complaints about it, I get a good mileage out of my battery (a single charge lasts me about 2 days) and the UI works smoothly.
A word of caution, IF YOU DON’T KNOW WHAT YOU ARE DOING THEN DON’T DO IT. If you do not understand the steps that were done or how to recover your original ROM in case something goes wrong then there’s a chance that you might brick your phone. I will not be liable if you brick your phone.
I only did all these because I wanted to get the most out of my phone’s hardware, besides I’m a geek. Hope this helps ^_^]]>